


9 Trail Habits That Quietly Destroy Pads, Rotors, and Calipers
Mountain switchbacks, rock gardens, and muddy descents are where off-road rigs shine—but they’re also where braking systems take a beating. Often it isn’t one dramatic mistake that cooks pads and warps rotors; it’s a handful of subtle habits repeated run after run. Here are nine quiet brake killers—and what to do instead to protect stopping power and wallet alike.
1. Riding the brakes on long descents
Dragging the pedal for minutes at a time keeps pads in constant contact, turning kinetic energy into relentless heat. That heat glazes pads, boils fluid, and can permanently distort rotors.
Fix it: Use engine braking first. Downshift early, pulse-brake in short, firm applications to let components cool between presses, and pull off if you smell resin or feel fade.
2. Braking hard with big, wet mud tires right after a water crossing
Cold rotors splashed with creek water can thermal-shock, and heavy, mud-packed tires amplify the bite when you first clamp down. Micro-cracks and uneven deposits start here.
Fix it: After crossings, lightly drag the brakes for 10–15 seconds to dry the faces. Make your first serious stop only once you’ve restored a thin, even transfer layer.
3. Stopping and holding with a hot pedal
Parking at a trailhead or photo spot after a steep descent and keeping the pedal applied traps pad imprint on a smoking-hot rotor. Later, it feels like “warped” rotors (it’s often pad material).
Fix it: Use the parking brake (if separate drum-in-hat) or chock a wheel. Let rotors cool with minimal clamping force, then do a few gentle rolls and stops before shutting down.
4. Power-washing straight into calipers and rotor faces
A concentrated, close-range jet drives grit past seals and strips the transfer film, leaving bare iron that flash-rusts unevenly. It also blasts away lubricant from slide pins.
Fix it: Rinse with a wide fan from behind the rotor, not point-blank at the friction faces. After washing, re-lube slide pins periodically and take a short drive to dry the system.
5. Ignoring load and gearing on steep grades
Oversize tires, rooftop tents, armor, and overland gear raise required brake torque. Staying in too high a gear lugs the engine and forces brakes to do all the work.
Fix it: Re-gear to match tire size and weight. Downshift earlier on climbs and descents. If you tow, consider a trailer brake controller to share the load.
6. Descending in 2WD when 4WD would stabilize
In loose, steep terrain, 2WD demands more brake intervention to keep speed in check. Wheels lock and unlock, generating hot spots and uneven wear.
Fix it: Use 4HI on faster dirt and 4LO for steep, technical drops. Let the driveline multiply control so the brakes correct, rather than carry, the descent.
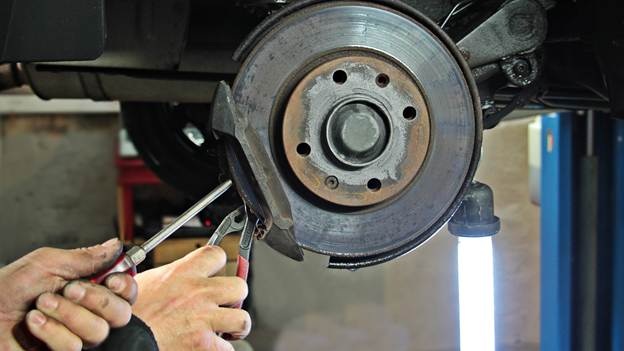
7. Never cleaning the “cooling stack” after mud
Mud cakes on dust shields, rotor hats, caliper brackets, and between pad ears. That contamination holds moisture against steel and prevents pads from retracting cleanly, causing drag.
Fix it: After muddy runs, pull wheels. Brush rotor hats and bracket channels; pop pads to clean ears/abutments; inspect boots; and apply a rubber-safe, high-temp brake grease on slide paths.
8. Mixing pad compounds without re-bedding
Swapping one axle to aggressive pads while leaving a street compound on the other can upset bias and heat distribution. Worse, installing new pads on rotors with an old transfer layer causes judder and glazing.
Fix it: Keep compounds matched, front and rear, for trail setups. Scuff rotors or replace them when changing compounds, then perform a proper bed-in: a series of moderate decels with cool-down.
9. Post-trail neglect of fluid and hardware
Brake fluid is hygroscopic and absorbs moisture from repeated water crossings and altitude swings. Worn boots and dried slide-pin grease make calipers stick, cooking one pad while you don’t notice—until the fade hits.
Fix it: Shorten your flush interval after a wet season; bleed until fluid runs clear. Inspect boots, replace pitted pins, confirm even pad thickness, and torque lugs to spec to prevent rotor runout.
Early Warning Signs You Shouldn’t Ignore
- Persistent chirp or scrape after mud: likely grit behind a pad or a bent dust shield.
- Pull under braking: seized slide pin or sticky piston on the “light” side.
- Pulsation on longer descents: uneven transfer layer, rotor thickness variation, or overheated pads.
- One hot wheel at rest: dragging parking brake shoe or stuck caliper.
Building a Trail-Safe Brake Routine
- Pre-run: check pad life, inspect boots, verify no fluid leaks, torque lugs, and confirm pedal firms
- During run: engine-brake early, pulse-brake, and pause to cool if you smell resin.
- After run: rinse smart, dry with gentle stops, and do a quick wheel-off inspection if conditions were sloppy.
- Seasonally: flush fluid, clean hardware channels, re-lube pins, and refresh rotor hats/brackets with protective coating where appropriate.
Strong brakes are an off-roader’s insurance policy. Change a few habits and you’ll dramatically extend pad and rotor life, keep calipers sliding freely, and avoid the dreaded trail-side fade that turns fun into risk. And if the damage is already done—glazing, judder, seized pins—don’t postpone the fix. Timely inspection and service now beats an emergency roadside swap later. When replacement is truly necessary, plan quality parts, proper bed-in, and a quick post-install check after the first heat cycle to confirm everything is happy. That’s the difference between constant tinkering and confident, predictable control on every descent—especially when the terrain and weather don’t play nice. If you’ve crossed the line from prevention to cure, it may be time to price out professional brake repalcement for 4×4 to reset the system and start fresh with better habits.